Texture Pack Creation Guide (English)
Restyle the game with your own art: board squares, the numbers on them, Chance-card artwork, slot-machine symbols, and the High-Low playing cards. A texture pack is one .esskin file; packs can replace *everything* or just a single image — every image you don't include keeps its normal look.
*(日本語版はこちら → TEXTURE_GUIDE.ja.md)*
1. How packs work
- A pack is a zip renamed to
.esskincontaining PNG images whose folder path is their meaning: an image atsquare/shop.pngreplaces the shop-square texture. - Packs are local: they change what *you* see. Other players' games are unaffected (and their packs don't affect you). Replays and spectating use *your* packs.
- You can enable several packs at once and order them (Settings → Display →各種見た目変更 → テクスチャパックの重ね順, "Texture-pack stack"). For each image the topmost pack that provides it wins; anything nobody provides falls back to the built-in look. Mixing a "board" pack with a "cards" pack just works.
- Some boards draw their own squares. A board author can put a picture of their own on a square — Dream World's bank is a wrapped sweet, not a generic bank — and by default the board's picture wins over yours, so the board still looks like itself. Your pack fills in everywhere the board said nothing, which is almost everywhere.
- A pack that redraws *most* of the board is treated as a whole-look statement and covers the board's own art instead. Each pack shows which way it went on its row in the stack screen, with the number it was judged on ("priority").
- Press
Bon a pack's row to decide it yourself: automatic → always beat the board→ always yield to the board → automatic. Your answer always outranks the number. - A pack you published carries the priority the site recorded for it, so everyone who installs it starts from the same behaviour; the operators can adjust it.
- The same rule covers building art, the backdrop (
board/background.png) and 3D models. - Anything missing, oversized, or broken simply falls back — a pack can never break the game.
2. The easy way — import one image at a time, in-game
No folders, no manifest.json.
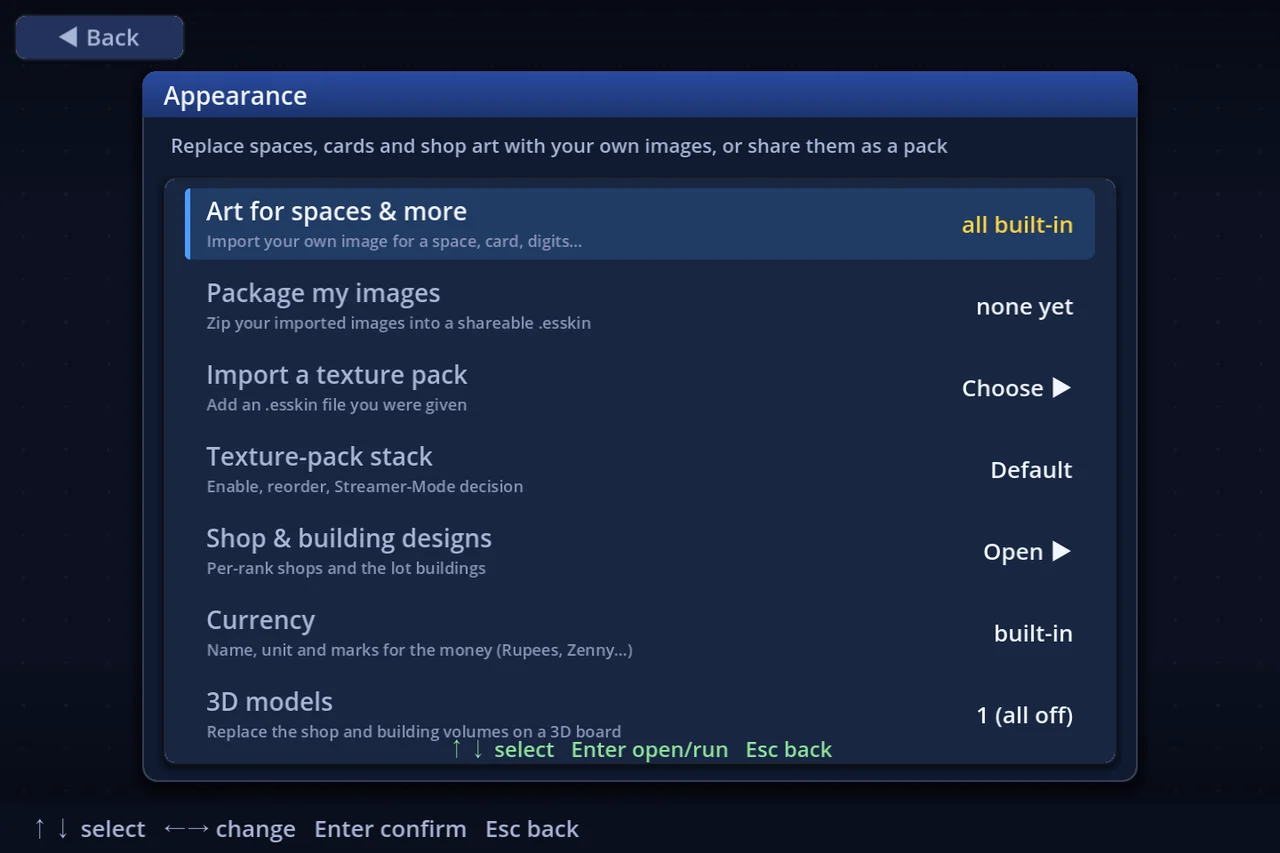
- Open Settings → Display → 各種見た目変更 → マスなどの見た目 ("Appearance → Art for squares & more" — the 見た目の一覧 / Art list).
- Select the row you want to change (bank, chance, switch…) and press Enter. A file picker opens — choose one image (png / jpg / webp / …).
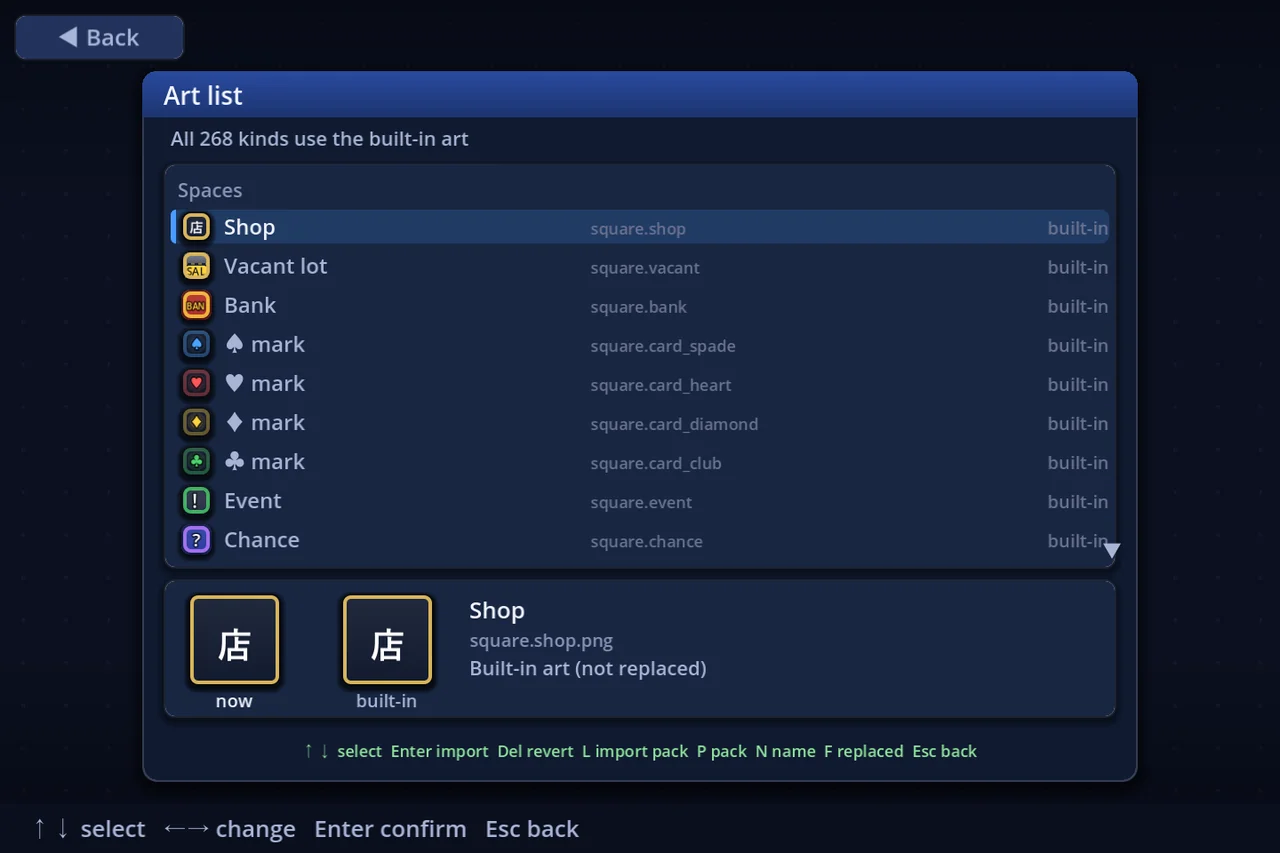
- It applies immediately, and the panel below shows now next to built-in so you can compare. Press Delete to put it back.
- Your imports collect into a pack called 「自分の画像」 (My images). N names it and P packages it into a shareable
myskin.esskininuser://skins/— hand that file to anyone. The appearance hub does the same from its 自分の画像をパックにする ("Package my images") row.
The rows that stand for a whole set — card artwork, slot symbols, trump faces, digits —take several files at once, and there the file name is the id (the part after the key's prefix): 12.png for chance.art.<id>.png, 0.png…9.png for digits (digits only take effect once all ten are present).
Anything larger than 1024×1024 is scaled down, and every import is re-encoded as PNG.
2a. Drawing inside the game — the Piece / Texture Studio
You can draw the art inside the game, with no external editor — and with the original still on screen beside you, so "what did the bank square's frame look like again?" is answered while you draw rather than from memory.
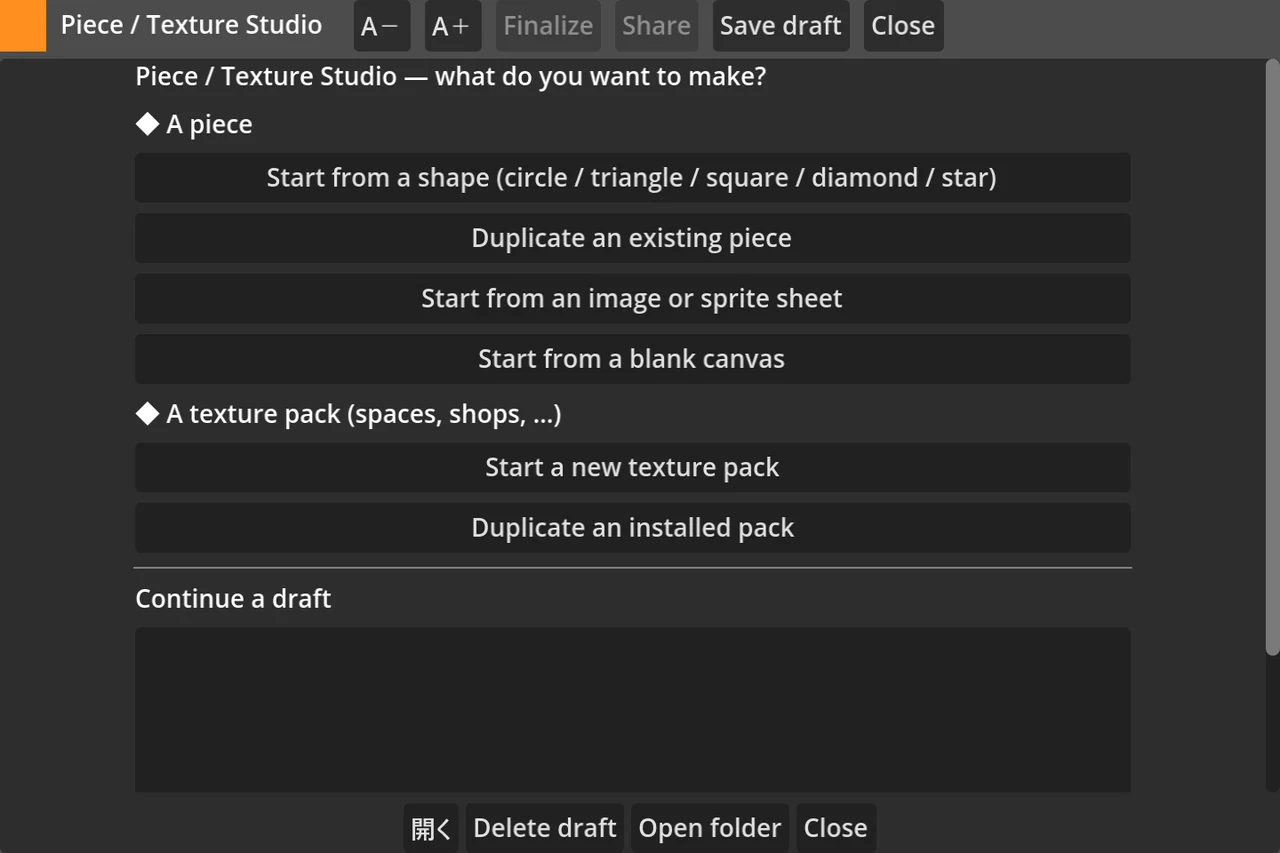
- Open コマ/テクスチャ工房 (Piece / Texture Studio) from the mode list (a Developer-Mode entry).
- Under "◆ A texture pack", press Start a new texture pack and name it. To fix up a pack you already have, press Duplicate an installed pack instead — the duplicate is a *new* pack and the original is never edited in place.
- On the Which art tab, pick what you want to replace and press Draw this one.
- It asks for a size (64px by default — one board square).
- With Start from the original ticked, the game's own art is copied in for you to paint over. The built-in art itself is never modified.
- Load from an image puts a picture you already have under that key.
- Draw on the Draw tab. The Compare column on the right shows three live samples of the key you are on — Draft / Now / Built-in — so you can check your work against the original at any moment.
- Trace over the original puts the built-in art faintly under your canvas.
- Copy the original in repaints the current key from the built-in art (undoable).
- Change the size scales what you have drawn.
- On the Pack info tab, fill in the name, author, version and description. Art style is either pixel art (crisp) or painted art (smooth).
- Make the pack writes an
.esskin, installs it and switches it on, so you can use it right away. Share does that first and then goes on to the publish form (where the description and changelog are typed).
Drafts live in user://skins/studio/<name>/ and use the same key-as-file-path layout as §4, so you can start a pack in the Studio and finish it in an external pixel editor —save the PNG outside and the Studio notices and offers to reload it.
A draft folder never reaches a match. Nothing you are half-way through drawing can show up in a game until you press Make the pack.
Other controls
- Text size — the A- / A+ buttons in the header (9–28). Remembered for next time.
- Deleting a draft — Delete draft at the bottom of the first screen. It asks first, and any
.esskinyou already made from that draft is not deleted. - Tags — set them on the Share form's Tags row (up to 5). “Featured” and “Official” are operator-only and are not offered.
3. Building a pack from a folder (quick start)
- Create a folder
user://skins/dev/MyPack/. On Windows that is%APPDATA%\EpochStreet\skins\dev\MyPack\. - Put a
manifest.jsonin it:
   { "format": 1, "name": "MyPack", "author": "you", "version": "1.0",
"filter": "nearest" }filter: "nearest" for crisp pixel art, "linear" for smooth painted art.
A pack may also say what the money in a match is called, so a themed pack can arrive already speaking its own currency:
   { "format": 1, "name": "Hyrule", "filter": "nearest",
     "currency": { "name": { "ja": "ルピー", "en": "Rupees" },
                   "unit": { "ja": "ルピー", "en": "R" } } }
name replaces the word "Cash" where it labels a figure; unit replaces the G after every number. Both are optional and independent (rename just the unit if you like), at most 10 and 6 characters. A player who set their own currency in Settings → Display → 各種見た目変更 → 通貨 outranks the pack.
A pack may name the shops and lot buildings too — replace only the pictures and the buildings go on being called "Custom image":
   { "format": 1, "name": "My High Street", "filter": "linear",
     "names": { "shopRank": { "3": { "en": "Silver Store" } },
                "lot":      { "tollbooth": { "en": "Checkpoint" } } } }
shopRank takes fee ranks "0"–"7"; lot takes tollbooth / inn / helipad / taxoffice / myhome / realestate / park (the amusement park has one picture per capital stage but only one name, so it is just park). At most 16 characters each. The language must match exactly — a name written only under "en" is shown only to players playing in English; everyone else sees the game's own name, so that nobody is handed a name they cannot read.
- Add images using the paths from the table below (start with one — e.g.
square/shop.png). A ready-made example lives in the repo atdocs/skin-template/(one sample of each category) — copy it and replace the art. - In-game: enable the pack in Settings → Display → 各種見た目変更 →テクスチャパックの重ね順 (Enter toggles the checkbox, ←→ moves a pack's priority). Press F5 any time — in the menu or mid-match — to see your latest saved edits instantly. The preview strip on that screen shows tiles, both digit sets, a card, a slot symbol and a trump card live.
- When happy, press P on your dev-folder row to package it into a shareable
MyPack.esskin(written next to the installed packs inuser://skins/).
4. Image paths (the full v1 list)
Sizes are the *design* sizes — other sizes are scaled to fit (keep the aspect ratio). PNG with transparency only.
| Path in the pack | Replaces | Size |
|---|---|---|
square/<type>.png — type is one of: shop, vacant, bank, card_spade, card_heart, card_diamond, card_club, event, chance, casino, cannon, stockbroker, lucky, superlucky, changingmark, switch, rest, warp, dice, vehicle, door, doorexit, barrier, vehicleexit, vehicleempty, stairsup, stairsdown | that square type's tile art (stairsup / stairsdown are the up and down staircases, used on boards with floors) | 64×64 |
square/<type>/<colour>.png — colour 0-63; type is one of the squares that CARRY a colour: warp, door, doorexit, cannon, switch, vehicle, vehicleexit, vehicleempty, stairsup, stairsdown | art for that colour only (e.g. square/warp/5.png = the warps whose colour is 5). A warp's colour is what pairs it with its destination, so it can have its own picture; a colour you do not cover falls through to the two rows below | 64×64 |
square/vacant.png | the empty lot. If you supply this, the game draws nothing of its own on the square — no gold SALE tag, no grey owner band, no dashed parcel hint, only the two rings that say which area it belongs to. Saying 「for sale」 is your picture's job (a built-on lot is different: it keeps the owner's colour band) | 64×64 |
square/changingmark/<suit>.png — suit is spade, heart, diamond, club | one image per suit for the changing-mark square. It cycles while you play, so this is what lets your art say which mark it grants next. Ship none and your square/changingmark.png is used with the suit symbol drawn on top, so the square is never unreadable | 64×64 |
square/<vehicle type>/<style>.png — type is vehicle, vehicleexit, vehicleempty; style is plane, ship, car, train, minecart | one image per vehicle style, so a board's ferry line and its train line still look different under your pack. Ship none and square/vehicle.png is used for every style | 64×64 |
square/tint/<type>.png — the same ten types | the colour mask over square/<type>.png: where it is opaque, the tile wears that square's own colour (multiplied, so your shading survives). One image covers all 64 colours — ship this when you cannot know the board. Only the mask from the same pack as the art is used | 64×64 |
square/shop.owned.png | optional variant for owned shops | 64×64 |
square/shop/building/<rank>.png — rank 0–7 | the shop-building pictogram per shopping-fee tier | 48×32 |
square/lot/<building>.png — tollbooth, helipad, taxoffice, myhome, realestate, inn, park0–park5 | the developed-lot building pictograms (inn = 宿屋) | 48×32 |
board/background.png | the backdrop behind the board (tiled) | 512×512 |
digits/board/0.png … 9.png, plus optional minus.png, g.png | the numbers drawn on squares (prices/fees) — this set is used *only* there | 16×22 per digit |
digits/payment/0.png … 9.png, minus.png, g.png | the big payment/salary numbers — a separate texture set from the square digits, never shared | 24×34 |
chance/back.png, chance/front.png | Chance-card back and face frame | 96×144 |
chance/art/<id>.png (id 0–109) | the artwork of Chance card #id | 80×80 |
slot/frame.png | the slot machine cabinet, drawn over the reels — keep the reel window (x 71–329, y 58–240) transparent | 400×372 |
slot/symbol/<n>.png — 1 slime, 2 stock, 3 warp, 4 wildcard, 8 seven | slot reel symbols | 48×48 |
square/event/<id>.png — id = a board-event id (1000+, spheres included) | The event square's art, one image per EVENT ID. Every id is listed in 見た目の一覧 (e.g. square.event.1013 → square/event/1013.png); ids you do not name keep the event face from square/<type>.png | 64×64 |
casino/<motif>.png — cherries, warp, dokodemo, seven, coin, coins, loss, holiday, turnaround, shopup, stockdiv, ska, die, twodice, ticket, hat, belt, shoes, chest, trap, boost | The casino minigame pictograms (prizes, chests, jack-in-the-box, boost) — shared by Scratch, Lucky Panel, Rope, Tarot and both races | 64×64 |
casino/racer/bird.png, casino/racer/slime.png | The race characters (bird = Legacy Race, slime = Modern Race). Tinted with the seat colour, so pale art keeps all four players distinct | 64×64 |
casino/tarot/who/<0-4>.png, casino/tarot/what/<0-7>.png | The tarot faces (who = Wheel of Fortune, Emperor, Hanged Man, Judgement, World / what = Chariot, Magician, Lovers, Death, Strength, Star, Moon, Sun) | 64×64 |
trump/back.png, trump/<suit>/<rank>.png — suit spade, heart, diamond, club, rank 1–13 (1 = Ace, 11–13 = J/Q/K) | the High-Low playing cards | 64×96 |
money/cash.png | the coin beside every player's cash and in the payment burst | 32×32 |
money/stock.png | a mark beside the stock figure — replaces the built-in TURNIP (蕎 = 「かぶ」, the pun the mark is) | 32×32 |
Notes:
- The two digit folders are separate textures (user ruling 2026-07-28): the game never uses
digits/board/glyphs outside squares, and never usesdigits/payment/glyphs on them. Ship one folder, the other, or both — each stands alone. Payment numbers always end in a G, so givedigits/payment/ag.pngor the payment screens will keep the regular font. - Digits are all-or-nothing per folder: if you provide
digits/board/, it must contain all of0–9(mixed-font numbers are unreadable, so the game refuses half sets).minus/gare optional. Digits are drawn monospaced (widest glyph sets the width) and bottom-aligned. - Square safe zones: the game draws information *on top of* your tile art — the owner colour band and rank at the top ≈ 12 px, prices and player dots at the bottom ≈ 14 px (of the 64 px design size). Keep those strips calm.
- Any subset is fine everywhere else — one card, three tiles, only digits: all valid.
- Future game features add new paths to this table; unknown paths in your pack only produce a warning, so packs stay compatible in both directions.
5. Finding a texture's name
The easy way: Settings → Display → 各種見た目変更 → マスなどの見た目 (the 見た目の一覧, "Art list"). Every replaceable image is listed kind by kind with its file path, how it looks now, how it looks built-in, and which pack replaced it. F narrows the list to what your pack actually replaced. No Debug Mode needed — and with nothing imported it still works as a plain "what does this square look like?" browser.
For a deeper trace, with Debug Mode on, open その他 → デバッグ → スキン監査 (Skin audit) during a match: it lists every texture path the game has requested this session and which pack answered (or "default"). Visit a screen (the board, a card, the slot…) and check the list — it's the fastest way to see what's left to cover.
6. Import, upload, download
- Import a pack you received — any of these does the same thing:
- drag the
.esskinonto the game window (main menu) - press L on the shop & building design screen (Settings → Display → 各種見た目変更 → お店・建物のデザイン)
- press L on the art list (見た目の一覧)
- Settings → Display → 各種見た目変更 → テクスチャパックを読み込む (this row, and the pack-order screen, appear in Test Mode and above)
An imported pack joins the list and is enabled straight away. Copying a file into the folder by hand does nothing — the set of enabled packs lives in skins.json, and only the import writes to it.
- Upload / download in game: this works (2026-08-22).
- Upload: U on the pack-order screen. Your
.esskinpublishes as askinpack. - Download: 通信する → 「絵」 (Skins). Installing one adds a row to the pack order.
- Handing the
.esskinover directly (Discord etc.) still works exactly as before. - There is only ONE format you author:
.esskin. The 「絵」 listing also carries packs made in an older, download-only format (texturepack). To a player they are the same thing —install one and it joins the same pack-order list, with the same enable / reorder / Streamer-Mode decision (2026-08-24). The only difference is whether you can create it, and what this game writes is.esskin. To build your own, follow §2 or §3. - Content rules: only art you have the right to share; nothing offensive.
- Streaming: imported packs start as off stream. While Streamer Mode is ON a pack you have not allowed is not drawn (the built-in tiles are). Allow it with T on its row, or manage every imported asset at once in Settings → Display → Streamer-Mode assets.
7. Limits (checked on import/publish)
| Limit | Value |
|---|---|
| Pack file size | up to 8 MB |
| Single image | up to 1024×1024 px |
| Files per pack | up to 2000 |
| Format | PNG (with alpha) |
| Name | up to 24 characters |
Building name (names) | up to 16 characters each |
A failed import lists exactly which rule was broken and for which file.
7a. Sharing a whole shop design
The images you import and the names you type in Settings → Display → 各種見た目変更 →お店デザイン become one .esskin when you press P on that screen. Whoever receives it presses I on the texture-pack screen and picks the file: the art and the names arrive together (an imported pack is enabled and put on top for you).
To keep a pack's art but go back to the names you are used to, there are two ways:
- N on the pack's row — turns off that pack's names only. The art stays exactly as it is.
- N then Enter with nothing typed on an お店デザイン row — that one slot goes back to the game's built-in name (Street Stall, Supermarket, Toll Booth…). Typing a name of your own of course outranks everything. Del takes the decision back and lets the pack name it again.
8. Tips
- Design at the nominal sizes first; test at real zoom levels with F5 before polishing.
- High-contrast, low-detail art reads best — tiles are small on screen.
- Test with all four player colours on the board: your tile art must not fight the owner bands and piece dots the game draws on top.
- Keep your dev folder under version control if the pack grows — a pack is just files.